Garlic Parmesan Cheeseburger Bombs
Golden, Gooey, Flavor-Packed Comfort Food
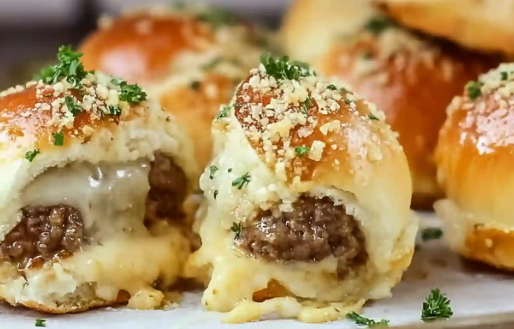
If you love cheeseburgers, garlic bread, and warm, pull-apart snacks, then Garlic Parmesan Cheeseburger Bombs are about to become your new obsession. These irresistible little bundles combine seasoned beef, melted cheese, and soft dough, all brushed with fragrant garlic butter and finished with a generous sprinkle of Parmesan. Crispy on the outside, juicy and cheesy on the inside, they’re the kind of food that disappears the moment it hits the table.
Perfect for parties, game nights, family dinners, or indulgent weekends, cheeseburger bombs deliver everything we crave about a burger—just in a fun, handheld form. They’re easy to make, endlessly customizable, and guaranteed to impress both kids and adults alike.
Why These Cheeseburger Bombs Are So Addictive
What makes these bombs special is the contrast of textures and flavors. The dough bakes into a golden, fluffy shell. Inside, the beef is savory and well-seasoned, while the cheese melts into a gooey center. Then comes the garlic-Parmesan finish—rich butter infused with garlic and herbs, soaking into the dough and creating that unmistakable garlic bread aroma.
They’re indulgent without being complicated, and they transform simple ingredients into something unforgettable.
Ingredients (Makes 12 Cheeseburger Bombs)
For the filling:
- 500 g (1 lb) ground beef (80/20 for best flavor)
- 1 small onion, finely diced
- 2 cloves garlic, minced
- 1 teaspoon salt
- ½ teaspoon black pepper
- 1 teaspoon paprika
- ½ teaspoon Italian seasoning
- 1 tablespoon Worcestershire sauce
- 1 tablespoon ketchup
- 150 g (1½ cups) shredded cheddar or mozzarella cheese
(or a mix of both for extra gooeyness)
For the dough:
- 1 can refrigerated biscuit dough or pizza dough
(or homemade dough, divided into 12 portions)
For the garlic Parmesan topping:
- 80 g (⅓ cup) unsalted butter, melted
- 3 cloves garlic, finely minced
- 50 g (½ cup) grated Parmesan cheese
- 1 tablespoon fresh parsley, finely chopped
- Optional: pinch of chili flakes or garlic powder
Optional extras:
- Pickle slices (chopped)
- Bacon bits
- Mustard or burger sauce inside the bombs
Step 1: Prepare the Cheeseburger Filling
Start by heating a skillet over medium heat. Add the ground beef and cook until browned, breaking it up with a spoon as it cooks. Once the beef releases its fat, add the diced onion and cook for 3–4 minutes until soft and fragrant. Stir in the minced garlic and cook for another 30 seconds.
Season the mixture with salt, pepper, paprika, and Italian seasoning. Add Worcestershire sauce and ketchup, stirring well to coat the meat evenly. This combination gives the beef that classic cheeseburger flavor—savory, slightly tangy, and deeply satisfying.
Remove the pan from heat and let the mixture cool slightly. This step is important, as hot filling can melt the dough and make assembly difficult. Once cooled, fold in the shredded cheese. The filling should be moist but not runny.
Step 2: Prepare the Dough
Preheat your oven to 190°C (375°F). Line a baking tray with parchment paper or lightly grease it.
Separate the biscuit or dough portions and flatten each one into a small circle, about 10 cm (4 inches) wide. The dough should be thin enough to wrap easily but sturdy enough to hold the filling without tearing.
Step 3: Assemble the Cheeseburger Bombs
Place a generous spoonful of the cheeseburger filling in the center of each dough circle. Be careful not to overfill—too much filling can cause leaks during baking.
Bring the edges of the dough up and over the filling, pinching firmly to seal. Roll gently between your hands to form a smooth ball, making sure the seam is completely closed. Place each bomb seam-side down on the prepared baking tray.
Repeat until all bombs are assembled.
Step 4: Make the Garlic Parmesan Butter
In a small bowl, mix the melted butter with minced garlic and chopped parsley. This aromatic butter is what transforms these from simple stuffed rolls into something truly crave-worthy.
Step 5: Bake to Golden Perfection
Brush each cheeseburger bomb generously with the garlic butter mixture. Sprinkle Parmesan cheese generously over the tops, pressing lightly so it adheres.
Bake in the preheated oven for 15–18 minutes, or until the bombs are puffed, golden brown, and fragrant. The bottoms should be lightly crisp, and the tops beautifully browned.
For extra color, you can switch to broil mode for the last 1–2 minutes, watching closely to avoid burning.
Serving Suggestions
Serve the Garlic Parmesan Cheeseburger Bombs warm, when the cheese is still melty and the dough soft. They’re fantastic on their own, but even better with dipping sauces such as:
- Classic ketchup
- Garlic aioli
- Honey mustard
- Burger sauce
- Ranch dressing
Arrange them on a platter and garnish with extra parsley and Parmesan for a party-ready presentation.
Tips for Perfect Cheeseburger Bombs
- Cool the filling before assembling to prevent soggy dough.
- Seal tightly to avoid cheese leaks.
- Use full-fat cheese for the best melt.
- Don’t overcrowd the tray, allowing air circulation for even baking.
Delicious Variations
- Bacon Cheeseburger Bombs: Add crispy bacon to the filling.
- Spicy Version: Mix in jalapeños or hot sauce.
- Mushroom Swiss: Use sautéed mushrooms and Swiss cheese.
- Chicken Cheeseburger Bombs: Swap beef for seasoned ground chicken.
- Vegetarian: Use seasoned mushrooms or plant-based meat.
Make-Ahead and Storage
You can assemble the bombs up to 24 hours ahead, cover them tightly, and refrigerate until ready to bake. Bake straight from the fridge, adding 2–3 minutes to the baking time.
Leftovers keep well in the refrigerator for up to 3 days and reheat beautifully in the oven or air fryer.
Conclusion
Garlic Parmesan Cheeseburger Bombs are everything comfort food should be—warm, cheesy, savory, and impossible to resist. They bring together the familiar flavors of a cheeseburger with the indulgence of garlic bread, all wrapped into a fun, bite-sized package.
Whether you’re feeding a crowd or treating yourself, these bombs guarantee smiles, full plates, and requests for the recipe. One bite is all it takes to understand why they never last long on the table 🍔🧄🧀✨