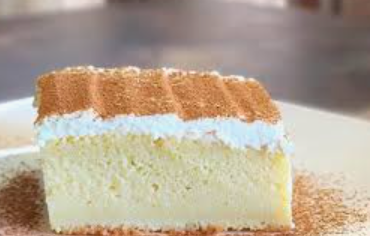
Melt-in-Your-Mouth Cake
There is something timeless and magical about a cake so soft and tender that it seems to dissolve the moment it touches your tongue. This Melt-in-Your-Mouth Cake is the kind of dessert that feels elegant yet comforting, simple yet luxurious. With a delicate crumb, rich buttery flavor, and a silky glaze that gently soaks into the surface, this cake is perfect for afternoon tea, celebrations, or whenever you crave something irresistibly soft and satisfying.
This recipe focuses on balance: the right ratio of butter, sugar, eggs, and flour ensures a tender structure, while sour cream adds moisture and a subtle tang that enhances the sweetness. The result is a cake that is light but rich, soft but structured, and deeply flavorful without being overly sweet.
Ingredients
For the Cake:
- 1 cup (226 g) unsalted butter, softened to room temperature
- 1 ½ cups (300 g) granulated sugar
- 4 large eggs, room temperature
- 2 teaspoons pure vanilla extract
- 2 ½ cups (315 g) all-purpose flour
- 2 teaspoons baking powder
- ½ teaspoon salt
- 1 cup (240 g) sour cream, room temperature
- ¼ cup (60 ml) whole milk
For the Silky Vanilla Glaze:
- 1 ½ cups (180 g) powdered sugar
- 2–3 tablespoons milk or cream
- 1 teaspoon vanilla extract
- Pinch of salt
Equipment
- 9-inch round cake pan or loaf pan
- Parchment paper
- Electric mixer (hand or stand)
- Mixing bowls
- Rubber spatula
- Cooling rack
Step 1: Preparing the Pan and Oven
Preheat your oven to 170°C (340°F). Grease your cake pan generously with butter and line the bottom with parchment paper. Lightly dust with flour and tap out the excess. Proper pan preparation ensures the cake releases beautifully without sticking, preserving its delicate texture.
Step 2: Creaming the Butter and Sugar
In a large bowl, beat the softened butter on medium speed for about 2 minutes until smooth and creamy. Gradually add the granulated sugar and continue beating for 3–5 minutes until the mixture becomes pale, light, and fluffy.
This step is crucial. Creaming incorporates air into the batter, which contributes to the soft, tender crumb that gives the cake its melt-in-your-mouth quality. Don’t rush this stage—proper aeration makes all the difference.
Step 3: Adding the Eggs and Vanilla
Add the eggs one at a time, beating well after each addition. Scrape down the sides of the bowl as needed. Once all eggs are incorporated, mix in the vanilla extract.
Room-temperature eggs blend more easily into the butter mixture, preventing curdling and ensuring a smooth batter. If your mixture looks slightly curdled, don’t worry—it will smooth out once the flour is added.
Step 4: Combining the Dry Ingredients
In a separate bowl, whisk together the flour, baking powder, and salt. Whisking evenly distributes the leavening agent and salt, ensuring consistent rise and flavor throughout the cake.
Step 5: Alternating Dry Ingredients and Sour Cream
Reduce the mixer speed to low. Add the dry ingredients in three additions, alternating with the sour cream and milk. Begin and end with the dry ingredients.
Mix only until just combined. Overmixing can develop too much gluten, making the cake dense instead of tender. The final batter should be smooth, thick, and creamy.
Step 6: Baking to Perfection
Pour the batter into the prepared pan and smooth the top with a spatula. Tap the pan gently on the counter to remove large air bubbles.
Bake for 45–55 minutes, depending on your oven and pan type. The cake is done when a toothpick inserted into the center comes out clean or with a few moist crumbs. The top should be lightly golden and slightly springy to the touch.
Avoid opening the oven door too early, as sudden temperature changes can cause the cake to sink.
Step 7: Cooling for Ultimate Texture
Allow the cake to cool in the pan for 10–15 minutes before transferring it to a wire rack. Let it cool completely before glazing.
Cooling allows the crumb to set properly. Cutting too soon may cause crumbling or a gummy texture.
Step 8: Preparing the Silky Vanilla Glaze
In a bowl, whisk together powdered sugar, vanilla extract, salt, and 2 tablespoons of milk or cream. Add more liquid gradually until you reach a smooth, pourable consistency.
The glaze should be thick enough to coat the back of a spoon but fluid enough to drizzle elegantly over the cake.
Step 9: Glazing the Cake
Once the cake is completely cool, drizzle the glaze over the top, allowing it to flow naturally down the sides. For a more indulgent finish, poke a few small holes in the cake with a skewer before glazing so some of it seeps inside, enhancing the melt-in-your-mouth experience.
Let the glaze set for 15–20 minutes before slicing.
Tips for the Softest Texture
- Use room-temperature ingredients. Cold ingredients don’t blend smoothly and can affect the crumb.
- Do not overbake. Even 5 extra minutes can dry out the cake. Check early.
- Measure flour properly. Spoon it into the measuring cup and level off—don’t scoop directly.
- Don’t overmix. Mix just until ingredients are incorporated.
Flavor Variations
Lemon Melt Cake
Replace vanilla with lemon zest and add 2 tablespoons fresh lemon juice. Use a lemon glaze instead of vanilla.
Almond Butter Cake
Replace ½ teaspoon of vanilla with almond extract for a delicate nutty aroma.
Coconut Soft Crumb Cake
Substitute ¼ cup of flour with finely shredded coconut for added richness.
Chocolate Swirl Version
Swirl ¼ cup melted chocolate into the batter before baking for a marbled effect.
Serving Suggestions
- Serve slightly warm with fresh berries.
- Pair with whipped cream for added lightness.
- Dust lightly with powdered sugar for a minimalist finish.
- Enjoy alongside tea or coffee for a comforting treat.
This cake also tastes even better the next day, as the flavors deepen and the crumb becomes even more tender.
Storage Instructions
Store the cake in an airtight container at room temperature for up to 3 days. For longer storage, refrigerate up to 5 days. Bring to room temperature before serving for the softest texture.
You can also freeze the unglazed cake tightly wrapped for up to 2 months. Thaw overnight in the refrigerator and glaze before serving.
Final Thoughts
The beauty of this Melt-in-Your-Mouth Cake lies in its simplicity. It doesn’t rely on complicated techniques or exotic ingredients. Instead, it celebrates the fundamentals of good baking—proper creaming, gentle mixing, and careful baking time.
The result is a cake that feels almost weightless, with a crumb so soft it seems to dissolve instantly. Whether you bake it for guests or simply for yourself, this recipe delivers comfort, elegance, and pure dessert satisfaction in every bite.
If you’d like, I can also give you a chocolate, caramel, or condensed milk version of this cake next.