Sweetened Condensed Milk Snowballs
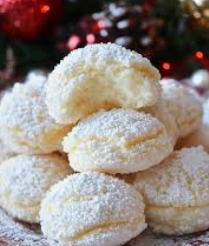
Sweetened Condensed Milk Snowballs are delicate, buttery, melt-in-your-mouth cookies rolled in a soft blanket of powdered sugar that resembles freshly fallen snow. These little treats are simple, nostalgic, and irresistibly tender. Made with sweetened condensed milk instead of traditional granulated sugar, they have a creamy richness and subtle caramelized sweetness that makes them extra special.
Perfect for holidays, tea time, gift boxes, or whenever you crave a soft and snowy bite of sweetness, these snowballs are easy to prepare and require only a handful of ingredients. Despite their simplicity, they deliver elegant flavor and a texture so soft it practically dissolves on your tongue.
Ingredients
For the Snowballs:
- 1 cup (226 g) unsalted butter, softened
- ½ cup (160 g) sweetened condensed milk
- 1 teaspoon pure vanilla extract
- 2 cups (250 g) all-purpose flour
- ¼ teaspoon salt
- ¾ cup finely chopped nuts (optional – walnuts, pecans, or almonds)
For Coating:
- 1 ½ cups powdered sugar
Equipment Needed
- Large mixing bowl
- Electric mixer or whisk
- Spatula
- Baking sheet
- Parchment paper
- Cooling rack
Step 1: Preparing Your Workspace
Preheat your oven to 170°C (340°F). Line a baking sheet with parchment paper. This prevents sticking and ensures even baking. Because these cookies are pale and delicate, parchment paper helps prevent over-browning on the bottoms.
Make sure your butter is softened but not melted. Properly softened butter should hold its shape but give easily when pressed.
Step 2: Creaming the Butter
In a large bowl, beat the softened butter on medium speed for about 2–3 minutes until it becomes light and fluffy. This step is essential because it incorporates air into the dough, which contributes to the soft texture.
Since we are not using granulated sugar, creaming is slightly different. The structure comes mostly from butter aeration and the flour’s light binding. Take your time here to ensure the butter becomes pale and creamy.
Step 3: Adding the Sweetened Condensed Milk
Slowly pour in the sweetened condensed milk while mixing on low speed. Once incorporated, add the vanilla extract.
The sweetened condensed milk adds both sweetness and moisture. It also creates a smooth, creamy consistency that gives these cookies their tender crumb. Scrape down the sides of the bowl to ensure everything blends evenly.
Step 4: Mixing the Dry Ingredients
In a separate bowl, whisk together the flour and salt. If using chopped nuts, stir them into the flour mixture so they distribute evenly throughout the dough.
Gradually add the dry ingredients into the butter mixture. Mix on low speed just until combined. Do not overmix, as overworking the flour can make the cookies tough instead of delicate.
The dough should be soft but not sticky. If it feels too soft to handle, refrigerate it for 20–30 minutes before shaping.
Step 5: Shaping the Snowballs
Using a tablespoon or small cookie scoop, portion the dough and roll it gently between your palms to form smooth balls about 1 inch (2.5 cm) in diameter.
Place them on the prepared baking sheet about 2 inches apart. These cookies do not spread much, so you can fit several on one sheet.
For perfectly round snowballs, handle the dough gently and avoid pressing too hard.
Step 6: Baking to Perfection
Bake in the preheated oven for 12–15 minutes. The bottoms should be lightly golden, but the tops should remain pale. Avoid overbaking—these cookies are meant to be soft and tender, not crisp.
You may notice slight cracking on the surface, which is normal. It gives the powdered sugar something to cling to later.
Once baked, remove from the oven and allow them to cool on the baking sheet for 5 minutes before transferring to a wire rack.
Step 7: First Powdered Sugar Coating
While the cookies are still slightly warm (but not hot), roll them gently in powdered sugar. The warmth helps the sugar adhere and form the first snowy layer.
Place them back on the rack to cool completely.
Step 8: Second Snowy Coating
Once the cookies are fully cooled, roll them again in powdered sugar. This second coating gives them their signature thick, snowy appearance.
Be generous—these are snowballs, after all!
Texture and Flavor Profile
These cookies are:
- Buttery and delicate
- Lightly sweet with creamy undertones
- Slightly crumbly yet soft
- Perfectly balanced in sweetness
The sweetened condensed milk gives a faint caramel note that sets them apart from traditional shortbread-style snowballs.
Optional Flavor Variations
Coconut Snowballs
Replace ½ cup of flour with finely shredded coconut for a tropical twist.
Almond Snowballs
Add ½ teaspoon almond extract and use finely chopped almonds.
Chocolate Drizzle
After the second sugar coating, drizzle with melted dark chocolate for contrast.
Lemon Snowballs
Add 1 teaspoon lemon zest for a bright citrus flavor.
No-Nut Version
Simply omit the nuts for a smooth, melt-away texture.
Storage Tips
Store snowballs in an airtight container at room temperature for up to 5 days. Separate layers with parchment paper to preserve the powdered sugar coating.
They also freeze beautifully. Freeze uncoated cookies for up to 2 months. Thaw at room temperature and coat with powdered sugar before serving.
Helpful Baking Tips
- Use high-quality butter for the best flavor.
- Measure flour correctly—spoon and level, don’t scoop.
- Chill dough if your kitchen is warm.
- Don’t overbake—pale tops are perfect.
- Roll gently to avoid compacting the dough.
Serving Suggestions
These cookies pair beautifully with:
- Coffee or espresso
- Black tea or chai
- Hot chocolate
- Holiday dessert platters
They are also perfect for gift boxes, baby showers, winter celebrations, or simply a cozy evening treat.
Why You’ll Love This Recipe
Sweetened Condensed Milk Snowballs are incredibly easy to make and require minimal ingredients. The condensed milk creates a smooth richness that makes these cookies softer and creamier than traditional versions.
They look elegant and festive but are simple enough for beginner bakers. The snowy powdered sugar coating gives them a charming appearance that feels magical and comforting.
Whether you make them for a special occasion or just to enjoy with a warm drink, these cookies are sure to become a favorite in your kitchen.
If you’d like, I can also give you a chocolate-stuffed version or a festive spiced holiday variation next.