No-Bake Pink Velvet Cheesecake Bites – Creamy, Easy & Party-Perfect Dessert
If you’re looking for a stunning dessert that’s as delicious as it is beautiful, these No-Bake Pink Velvet Cheesecake Bites are exactly what you need. Creamy, smooth, slightly tangy, and perfectly sweet, these bite-sized treats combine the luxurious texture of cheesecake with a playful pink velvet twist. The best part? No oven required! That means less hassle, less heat in your kitchen, and more time to enjoy the celebration.
Perfect for birthdays, baby showers, Valentine’s Day, bridal showers, or any festive gathering, these cheesecake bites are easy to make ahead and guaranteed to impress your guests.
Why You’ll Love This Recipe
- No baking required
- Perfect make-ahead dessert
- Beautiful pink color for special occasions
- Easy to customize
- Bite-sized and party-friendly
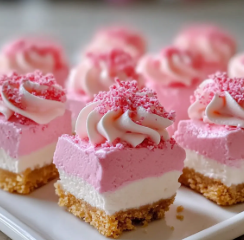
These little treats are rich without being overwhelming, and their creamy filling paired with a buttery crust creates the perfect balance.
Ingredients
For the Crust:
- 1 ½ cups graham cracker crumbs (or digestive biscuit crumbs)
- ¼ cup granulated sugar
- 6 tablespoons unsalted butter, melted
For the Pink Velvet Cheesecake Filling:
- 16 oz (450g) cream cheese, softened to room temperature
- ½ cup powdered sugar
- 1 teaspoon vanilla extract
- 1 cup heavy whipping cream (cold)
- 1–2 teaspoons pink gel food coloring
- 1 tablespoon lemon juice (optional, for brightness)
Optional Toppings:
- White chocolate drizzle
- Pink sprinkles
- Fresh raspberries
- Crushed freeze-dried strawberries
- Whipped cream swirls
Equipment Needed
- Mixing bowls
- Electric hand mixer or stand mixer
- Silicone mini muffin pan or lined mini cupcake tin
- Spatula
- Measuring cups and spoons
- Refrigerator
Step-by-Step Instructions
Step 1: Prepare the Crust
Start by combining the graham cracker crumbs and sugar in a mixing bowl. Stir until evenly mixed. Pour in the melted butter and mix until the crumbs resemble wet sand. The mixture should hold together when pressed between your fingers.
Line a mini muffin tin with paper liners or use a silicone mold. Spoon about 1 tablespoon of the crust mixture into each cavity. Press it down firmly using the back of a spoon or your fingers to create a compact base.
Place the pan in the refrigerator for at least 20–30 minutes to allow the crust to firm up while you prepare the filling.
Step 2: Make the Pink Velvet Cheesecake Filling
In a large mixing bowl, beat the softened cream cheese until smooth and creamy. This step is crucial — any lumps now will remain in the final dessert.
Add powdered sugar and vanilla extract, and beat again until fully incorporated. If using lemon juice, add it at this stage for a subtle brightness that enhances the flavor.
In a separate chilled bowl, whip the heavy cream until stiff peaks form. The cream should be thick and hold its shape.
Gently fold the whipped cream into the cream cheese mixture using a spatula. Take your time and fold carefully to maintain the airy texture.
Add pink gel food coloring a little at a time, mixing until you reach your desired shade. Gel coloring works best because it provides vibrant color without thinning the mixture.
Step 3: Assemble the Cheesecake Bites
Remove the crusts from the refrigerator. Spoon or pipe the pink cheesecake filling on top of each crust, filling nearly to the top.
Smooth the tops with a spatula or leave them slightly swirled for a decorative look.
Return the pan to the refrigerator and chill for at least 3–4 hours, or until fully set. For best results, chill overnight.
Step 4: Decorate and Serve
Once fully set, carefully remove the cheesecake bites from the pan. If using a silicone mold, gently push from the bottom to release them.
Decorate as desired:
- Drizzle melted white chocolate over the top.
- Add a swirl of whipped cream.
- Sprinkle with pink or gold sprinkles.
- Garnish with a fresh raspberry.
Serve chilled and enjoy!
Tips for Perfect Cheesecake Bites
1. Use Room Temperature Cream Cheese
Cold cream cheese can cause lumps. Let it sit at room temperature for about 30–45 minutes before mixing.
2. Chill the Bowl for Whipping Cream
Cold tools help the cream whip faster and achieve stiff peaks.
3. Don’t Overmix
Once the whipped cream is folded in, avoid overmixing to keep the texture light and fluffy.
4. Make Ahead
These bites can be made 1–2 days in advance. Store in an airtight container in the refrigerator.
Flavor Variations
Want to switch things up? Try these fun ideas:
Strawberry Pink Velvet
Add 2 tablespoons of strawberry puree or crushed freeze-dried strawberries to the filling for natural fruity flavor.
Chocolate Pink Velvet
Fold in mini white chocolate chips for extra texture.
Lemon Pink Velvet
Increase the lemon juice and add a little lemon zest for a citrus twist.
Oreo Crust
Replace graham crackers with crushed chocolate sandwich cookies for a cookies-and-cream version.
Storage Instructions
Store cheesecake bites in an airtight container in the refrigerator for up to 4 days.
You can also freeze them for up to 2 months. Place them in a freezer-safe container with parchment between layers. Thaw overnight in the refrigerator before serving.
Nutritional Note
These cheesecake bites are rich and indulgent, but their small size makes portion control easy. You get the satisfaction of cheesecake without committing to a large slice.
Serving Ideas
These pink velvet cheesecake bites look beautiful displayed on:
- A white cake stand
- A dessert charcuterie board
- Mini cupcake wrappers
- Tiered party trays
They pair wonderfully with:
- Sparkling lemonade
- Fresh berries
- Iced tea
- Coffee
Why Pink Velvet?
Pink velvet is a playful twist on classic red velvet, offering a softer, more romantic aesthetic. It’s elegant yet fun, making it ideal for celebrations where presentation matters just as much as flavor.
Final Thoughts
No-Bake Pink Velvet Cheesecake Bites are the ultimate easy dessert that looks bakery-worthy without complicated steps. Their creamy texture, vibrant color, and buttery crust make them irresistible.
Whether you’re hosting a party, celebrating a special occasion, or simply craving something sweet and beautiful, these cheesecake bites are guaranteed to impress.
Make them once, and they’ll quickly become a go-to dessert in your recipe collection. Enjoy every creamy, dreamy bite! 💗