🍫 Elevate Your Dessert Game with Marbled Chocolate Tulip Cups
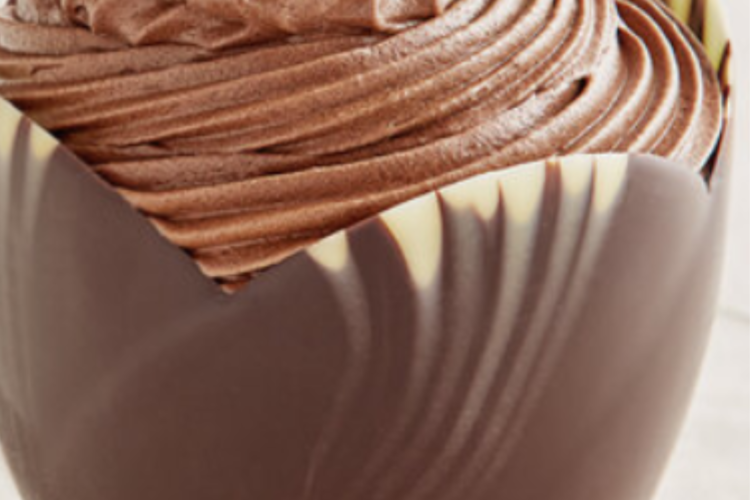
If you’re looking for a dessert that’s as visually stunning as it is delicious, marbled chocolate tulip cups are the perfect choice. These elegant edible cups are made entirely of chocolate, shaped like delicate tulip petals, and decorated with a beautiful marbled pattern created by combining dark and white chocolate. They are ideal for serving mousse, ice cream, fruit, or whipped cream-based desserts, instantly turning even simple fillings into a gourmet presentation.
Despite their sophisticated look, these chocolate tulip cups are surprisingly easy to make at home. With just a few ingredients, a bit of patience, and some creativity, you can craft a dessert centerpiece that will impress guests at dinner parties, birthdays, or special occasions.
Let’s dive into this detailed, step-by-step guide to mastering marbled chocolate tulip cups.
🛒 Ingredients
For the Chocolate Cups:
- 200g dark chocolate (good quality)
- 150g white chocolate
- 1 tablespoon coconut oil or vegetable oil (optional, for smoother texture)
For Filling Ideas (Optional):
- Chocolate mousse
- Vanilla whipped cream
- Fresh fruits (strawberries, raspberries, mango cubes)
- Ice cream or gelato
- Custard or pastry cream
🍽️ Equipment Needed
- Balloons (small, water-balloon size)
- Microwave-safe bowls or double boiler
- Spoon or spatula
- Baking tray
- Parchment paper
- Refrigerator
🔥 Step 1: Preparing Your Workspace
Before working with chocolate, it’s important to set up your workspace properly. Line a baking tray with parchment paper and make sure all your tools are clean and completely dry. Even a small drop of water can cause chocolate to seize and become unusable.
Inflate small balloons to the size you want your dessert cups. Tie them securely and lightly grease them with a tiny amount of oil to prevent sticking.
🍫 Step 2: Melting the Chocolate
Melt the dark chocolate using a microwave or double boiler method.
Microwave method:
Heat the chocolate in 20-second intervals, stirring between each interval until smooth.
Double boiler method:
Place a heatproof bowl over a pot of simmering water, making sure the bottom doesn’t touch the water. Stir until melted.
Repeat the same process for the white chocolate in a separate bowl.
If desired, add a small amount of coconut oil to each chocolate to make it smoother and easier to work with.
🎨 Step 3: Creating the Marbled Effect
This is where the magic happens!
Pour the melted dark chocolate into a bowl wide enough to dip the balloons. Add spoonfuls of white chocolate on top. Use a toothpick or skewer to gently swirl the two chocolates together.
Important tip: Do not overmix. You want distinct swirls, not a fully blended color. The contrast between dark and white chocolate creates the elegant marbled look.
🎈 Step 4: Dipping the Balloons
Hold a balloon by the knot and gently dip it into the marbled chocolate mixture. Rotate slightly to coat the bottom half evenly.
Lift the balloon and let excess chocolate drip off. Then place it on the prepared parchment paper.
Repeat with all balloons.
🌷 Step 5: Shaping the Tulip Petals
To create the “tulip” effect, use a spoon to gently pull the chocolate upward around the sides of the balloon. This forms soft, petal-like edges rather than a simple round cup.
You can make each one unique—some petals can be taller, others curved or slightly folded. This adds a natural, artistic touch.
❄️ Step 6: Setting the Chocolate
Place the tray in the refrigerator for about 20–30 minutes, or until the chocolate is completely firm.
Once hardened, carefully remove the tray.
💥 Step 7: Removing the Balloons
This step is satisfying but requires a gentle touch.
Hold the balloon and slowly deflate it by making a small pinhole near the knot. As the air escapes, the balloon will pull away from the chocolate.
Carefully remove the balloon without breaking the delicate chocolate shell.
You’ll now have beautiful marbled chocolate tulip cups!
🍨 Step 8: Filling Your Tulip Cups
Now comes the fun part—filling your edible creations.
Here are some delicious ideas:
1. Chocolate Mousse
Fill each cup with rich, airy chocolate mousse and top with chocolate shavings.
2. Fresh Fruit & Cream
Add whipped cream and fresh berries for a light and refreshing dessert.
3. Ice Cream Delight
Place a scoop of vanilla or chocolate ice cream inside the cup and drizzle with syrup.
4. Custard & Caramel
Fill with smooth custard and a drizzle of caramel sauce.
🎉 Step 9: Presentation Tips
Presentation makes all the difference with this dessert.
- Place each tulip cup on a dessert plate
- Add a drizzle of chocolate or fruit sauce around the plate
- Garnish with mint leaves or powdered sugar
- Serve immediately if filled with ice cream
These cups can also be arranged on a large platter for a stunning party display.
💡 Expert Tips for Success
- Use high-quality chocolate: It melts better and tastes richer.
- Avoid overheating: Burnt chocolate becomes thick and grainy.
- Work quickly: Chocolate sets fast, especially in cooler environments.
- Keep balloons small: Larger balloons make fragile cups.
- Handle gently: The finished cups are delicate and can crack easily.
🌈 Creative Variations
- Colored chocolate: Add food coloring to white chocolate for vibrant designs.
- Nut-coated edges: Sprinkle crushed nuts on the rims before setting.
- Gold dust finish: Brush edible gold dust for a luxury look.
- Flavored chocolate: Add orange zest or coffee powder for a twist.
❤️ Why You’ll Love This Recipe
Marbled chocolate tulip cups are more than just a dessert—they’re an experience. They combine artistry and flavor, transforming simple ingredients into something extraordinary.
They’re:
- Elegant and eye-catching
- Customizable with endless fillings
- Surprisingly easy to make
- Perfect for special occasions or celebrations
Whether you’re hosting guests or just treating yourself, these chocolate tulip cups will elevate your dessert game and leave everyone impressed.