:
🥖 Charcuterie Cones (Individual Grab-and-Go Appetizers)
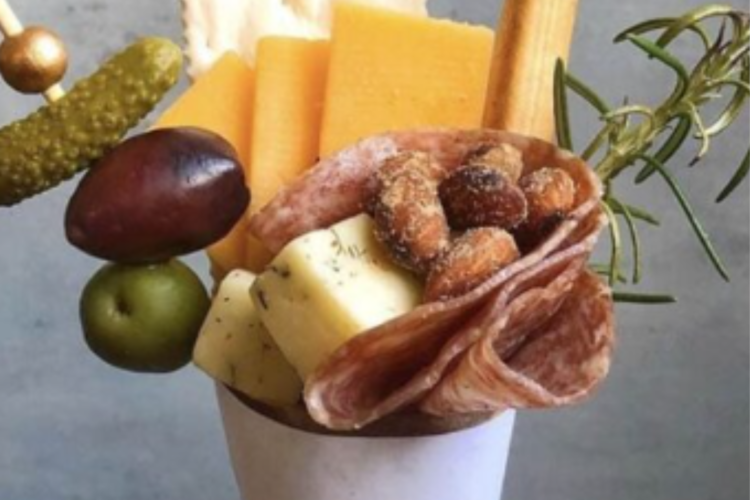
Charcuterie cones are a modern twist on the classic charcuterie board. Instead of arranging everything on a large platter, each serving is beautifully assembled in a paper cone or cup, making it easy for guests to grab and enjoy. These individual appetizers are perfect for parties, weddings, picnics, or any event where convenience and style matter.
They combine cured meats, cheeses, fresh fruits, crunchy snacks, and sometimes a sweet treat—all layered into a compact, visually stunning cone. Best of all, they are customizable, require no cooking, and can be prepared ahead of time.
🛒 Ingredients
For the Base (Per 8–10 cones)
- 8–10 paper cones (or parchment paper shaped into cones)
- Small wooden skewers or cocktail sticks (optional)
Meats (Choose 2–3 types)
- 150g salami slices
- 150g prosciutto
- 100g smoked turkey or ham
Cheeses (Choose 2–3 varieties)
- 150g cheddar (cubed)
- 150g mozzarella balls (mini bocconcini)
- 100g gouda or edam (cubed or sliced)
- Optional: brie wedges or goat cheese chunks
Crunchy Elements
- Breadsticks (grissini)
- Crackers (small, sturdy varieties)
- Pretzels
Fresh Fruits
- Grapes (red or green)
- Apple slices (tossed in lemon juice to prevent browning)
- Strawberries (halved if large)
Extras & Fillers
- Olives (pitted)
- Cherry tomatoes
- Pickles or cornichons
- Roasted nuts (almonds, cashews, or walnuts)
- Dried fruits (apricots, cranberries, figs)
Optional Sweet Treats
- Small chocolates
- Honey sticks
- Mini cookies
🔪 Preparation Steps
1. Prepare the Cones
If using store-bought paper cones, simply open them and set aside. If making your own, cut parchment paper into large triangles and roll them into cone shapes, securing with tape or a small staple.
Place the cones in a tall glass or jar to hold them upright while you assemble the ingredients.
2. Prepare the Ingredients
Cut cheeses into bite-sized cubes or small wedges. Slice harder cheeses neatly, while keeping soft cheeses in small chunks.
Wash and dry all fruits thoroughly. Keep grapes in small clusters for visual appeal. Slice apples just before assembling and lightly toss them in lemon juice.
Fold or roll the cured meats into decorative shapes:
- Fold salami into halves or quarters
- Roll prosciutto into loose ribbons
- Create small rosettes for a more elegant presentation
These shapes not only look attractive but also make the cones easier to eat.
3. Start with the Base Layer
To prevent smaller items from falling to the bottom, start by adding a base layer inside each cone. This can include a few nuts or a small piece of parchment to support the structure.
You can also place a small piece of cheese or a folded slice of meat at the bottom to anchor the cone.
4. Add the Main Components
Begin building each cone by placing larger items first:
- Insert a breadstick or a few crackers vertically at the back of the cone.
- Add folded meats along one side.
- Place cubes of cheese on the opposite side for balance.
Try to distribute ingredients evenly so each cone has a similar variety.
5. Fill with Fruits and Extras
Add fruits like grapes or strawberries near the top so they are visible and easy to grab.
Tuck in olives, cherry tomatoes, or pickles in between the meats and cheeses to fill gaps and add bursts of flavor.
Sprinkle a few nuts or dried fruits throughout the cone for texture and variety.
6. Add Finishing Touches
For an extra-special touch, include a small skewer with a combination of items such as a grape, cheese cube, and olive.
If you want a sweet element, tuck in a small chocolate or mini cookie near the top.
Make sure the cones look full and abundant, but not overcrowded. The goal is to make everything visible and accessible.
7. Chill and Serve
Place the assembled cones in the refrigerator for about 20–30 minutes before serving. This helps keep everything fresh, especially the meats and cheeses.
Serve the cones upright in a tray, box, or decorative stand. You can use glasses, jars, or even a custom holder to keep them stable.
🍽️ Serving Suggestions
Charcuterie cones are ideal for:
- Weddings and cocktail parties
- Birthday celebrations
- Holiday gatherings
- Picnics and outdoor events
- Corporate events or meetings
Arrange them in rows on a serving tray or place them in individual holders for a polished look.
💡 Tips for Success
- Balance flavors: Include salty meats, creamy cheeses, sweet fruits, and crunchy elements.
- Think visually: Use a variety of colors and textures to make each cone attractive.
- Keep portions small: Each cone should be easy to hold and eat without being too heavy.
- Use sturdy ingredients: Avoid items that are too soft or messy.
- Prepare ahead: Assemble a few hours in advance and refrigerate until serving.
🌿 Variations
🧀 Vegetarian Cones
Skip the meats and add more cheeses, grilled vegetables, hummus cups, and extra nuts.
🌶️ Spicy Cones
Include spicy salami, pepper jack cheese, and chili-seasoned nuts.
🍯 Sweet & Savory Cones
Add honey sticks, dark chocolate, and fresh berries for a sweet contrast.
🥗 Mediterranean Cones
Use feta cheese, olives, cherry tomatoes, cucumber slices, and pita chips.
🥪 Mini Sandwich Cones
Add small sandwich bites or wraps for a more filling option.
🧡 Why You’ll Love This Recipe
- No cooking required: Perfect for quick preparation
- Elegant presentation: Looks professional and impressive
- Individual servings: Hygienic and convenient
- Customizable: Adapt to any taste or occasion
- Fun to assemble: Great for involving family or kids
🎉 Conclusion
Charcuterie cones are a creative and practical way to serve a variety of delicious bites in a compact, stylish format. They take the classic concept of a charcuterie board and transform it into a portable, mess-free appetizer that’s perfect for modern entertaining.
With endless combinations of meats, cheeses, fruits, and snacks, you can tailor each cone to suit your preferences or theme. Whether you’re hosting a large event or preparing a small gathering, these cones are guaranteed to impress your guests and make your table stand out.