Authentic Hawaiian Huli Huli Chicken – Easy Grill Recipe for Summer BBQs!
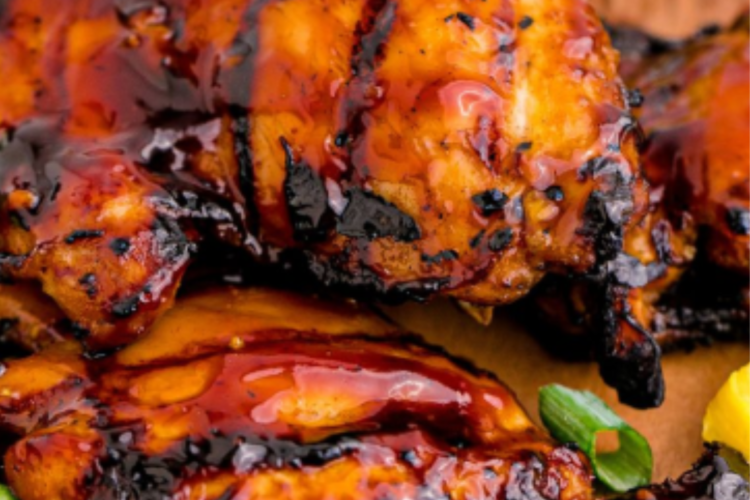
Authentic Hawaiian Huli Huli Chicken is one of the most iconic grilled dishes to come out of the islands of Hawaii. Sweet, smoky, sticky, and deeply savory, this crowd-pleasing chicken is famous for its glossy glaze and irresistible caramelized edges. The name “huli” means “turn” in Hawaiian, referring to the traditional method of rotating the chicken over an open flame as it cooks.
Originally popularized in the 1950s by Ernest Morgado during community fundraisers, Huli Huli Chicken quickly became a staple at roadside stands and backyard gatherings across the islands. Today, it remains a must-have at summer BBQs, bringing tropical flavor to grills everywhere.
This 1000-word guide will walk you through everything you need to know to make authentic, juicy, perfectly caramelized Huli Huli Chicken at home.
What Makes Huli Huli Chicken Unique?
Unlike many grilled chicken recipes, Huli Huli Chicken relies on a bold marinade and glaze that balances:
- Sweetness (pineapple juice & brown sugar)
- Saltiness (soy sauce)
- Aromatics (garlic & ginger)
- Tang (rice vinegar)
- Smokiness (grill char)
The magic happens when the sugars caramelize over the grill, forming that signature sticky, lacquered coating.
Ingredients (Serves 4–6)
For the Chicken:
- 1.5–2 kg chicken thighs and drumsticks (bone-in, skin-on recommended)
- Oil for brushing grill grates
For the Marinade & Basting Sauce:
- 1 cup pineapple juice (unsweetened)
- ½ cup soy sauce
- ½ cup brown sugar
- ¼ cup ketchup
- 2 tablespoons rice vinegar
- 3 cloves garlic, minced
- 1 tablespoon fresh ginger, grated
- 1 tablespoon sesame oil
- 1 teaspoon freshly ground black pepper
- 1–2 teaspoons chili flakes (optional)
Step 1: Prepare the Marinade
In a medium saucepan, combine:
- Pineapple juice
- Soy sauce
- Brown sugar
- Ketchup
- Rice vinegar
- Garlic
- Ginger
- Sesame oil
- Black pepper
Bring to a gentle simmer over medium heat, stirring until the sugar dissolves. Simmer for about 5 minutes to slightly thicken. Remove from heat and let cool completely.
Important: Reserve about 1 cup of the sauce separately for basting later. Never baste with marinade that touched raw chicken.
Step 2: Marinate the Chicken
Place chicken pieces in a large bowl or zip-top bag. Pour the cooled marinade over the chicken, ensuring everything is well coated.
Cover and refrigerate for at least 4 hours, but preferably overnight (8–24 hours). The longer it marinates, the deeper the flavor.
Turn occasionally for even absorption.
Step 3: Prepare the Grill
Preheat your grill to medium heat (about 375°F / 190°C). Set up a two-zone cooking area:
- Direct heat side
- Indirect heat side
Oil the grill grates to prevent sticking.
Charcoal grills provide the most authentic smoky flavor, but gas grills work beautifully too.
Step 4: Grill the Chicken
Remove chicken from the marinade and shake off excess liquid.
Place chicken skin-side down over direct heat. Grill for 5–7 minutes until lightly charred.
Flip (“huli”!) and cook the other side for another 5–7 minutes.
Move chicken to indirect heat and continue cooking for 20–30 minutes, turning every 5–7 minutes and brushing generously with reserved basting sauce each time.
Internal temperature should reach 165°F (75°C).
The frequent turning and basting create layers of sticky glaze and deep caramelization — the hallmark of true Huli Huli Chicken.
Step 5: Final Glaze & Rest
In the last 5 minutes of cooking, brush one final layer of sauce and allow it to bubble and caramelize slightly.
Remove chicken from grill and let rest for 5–10 minutes before serving. Resting helps retain juices and enhances tenderness.
Serving Suggestions
Huli Huli Chicken is traditionally served with simple sides that let the chicken shine.
Classic Hawaiian Plate Lunch Style:
- Steamed white rice
- Macaroni salad
- Grilled pineapple slices
Summer BBQ Pairings:
- Coleslaw
- Grilled corn
- Fresh mango salsa
- Hawaiian sweet rolls
You can also shred leftovers for sandwiches, tacos, or rice bowls.
Pro Tips for Perfect Huli Huli Chicken
1. Use Bone-In, Skin-On Chicken
The skin protects the meat and crisps beautifully while caramelizing.
2. Control the Heat
Because of the sugar in the sauce, flare-ups can happen. Move chicken to indirect heat if flames get too strong.
3. Baste Frequently
Multiple layers of glaze build that signature sticky coating.
4. Let It Rest
Don’t skip resting time — it makes a noticeable difference in juiciness.
Oven Method (If No Grill Available)
Preheat oven to 400°F (200°C).
Place marinated chicken on a lined baking sheet. Bake for 35–45 minutes, turning halfway through and basting regularly.
Finish under the broiler for 3–5 minutes to achieve caramelized edges.
Storage & Reheating
Refrigeration:
Store leftovers in an airtight container for up to 4 days.
Freezing:
Freeze cooked chicken for up to 2 months.
Reheating:
Reheat in oven at 350°F until warmed through. Brush lightly with extra sauce before reheating to refresh moisture.
Flavor Variations
While traditional Huli Huli Chicken keeps things simple, you can customize it:
- Add a splash of orange juice for extra citrus brightness
- Include crushed red pepper for heat
- Add a tablespoon of honey for richer sweetness
- Smoke with mesquite or hickory wood chips for deeper flavor
Why This Recipe Is Perfect for Summer BBQs
Huli Huli Chicken is ideal for summer gatherings because:
- It feeds a crowd
- It can be prepped ahead
- It pairs with almost any side dish
- It delivers bold, tropical flavor
The aroma of caramelizing pineapple and soy sauce drifting from the grill instantly creates a festive atmosphere.
The History Behind the Name
The term “Huli Huli” literally means “turn turn.” Vendors traditionally cooked chicken between two grills and flipped (“huli’d”) the entire setup during cooking. This rotating technique ensured even heat and beautiful caramelization on both sides.
Over time, the method evolved, but the frequent turning and basting remain essential to achieving the authentic flavor and texture.
Final Thoughts
Authentic Hawaiian Huli Huli Chicken is everything you want in a summer BBQ recipe: juicy, smoky, sticky, sweet, and packed with flavor. With its simple marinade and straightforward grilling method, it’s approachable for beginners yet impressive enough for seasoned grill masters.