Berrylicious Cheesecake Tacos
A playful dessert that combines creamy cheesecake filling, crispy sweet taco shells, and a burst of fresh berries in every bite.
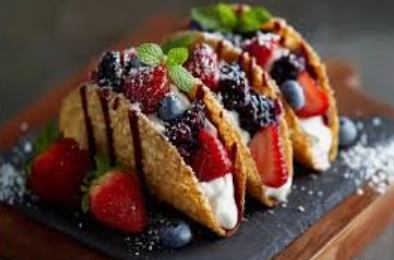
If you love cheesecake and you love fun, hand-held desserts, these Berrylicious Cheesecake Tacos are about to become your new favorite treat. Imagine crisp, golden taco shells coated in cinnamon sugar, filled with silky no-bake cheesecake cream, and topped with vibrant strawberries, blueberries, and raspberries. They’re perfect for parties, birthdays, brunch spreads, or whenever you want something that feels bakery-worthy but is surprisingly easy to make at home.
This recipe makes about 10–12 dessert tacos, depending on the size of your tortillas.
🛒 Ingredients
For the Taco Shells:
- 10–12 small flour tortillas (6-inch size works best)
- ½ cup (100g) granulated sugar
- 1 teaspoon ground cinnamon
- 4 tablespoons unsalted butter, melted
- Vegetable oil for frying (or use oven method below)
For the Cheesecake Filling:
- 16 oz (450g) cream cheese, softened
- 1 cup (120g) powdered sugar
- 1 teaspoon pure vanilla extract
- 1 tablespoon fresh lemon juice (optional, but brightens flavor)
- 1 cup (240ml) heavy whipping cream, cold
For the Berry Topping:
- 1 cup fresh strawberries, diced
- 1 cup fresh blueberries
- 1 cup fresh raspberries
- 2 tablespoons sugar (optional, depending on sweetness of berries)
- 1 teaspoon lemon zest
Optional Garnishes:
- White chocolate drizzle
- Extra powdered sugar
- Fresh mint leaves
🥣 Step 1: Prepare the Cinnamon Sugar
In a shallow bowl, mix together the granulated sugar and ground cinnamon. Stir well until evenly combined. Set aside. This mixture will coat the taco shells and give them that irresistible churro-like flavor.
🌮 Step 2: Make the Crispy Taco Shells
Frying Method (Traditional & Crispiest)
- Heat about 1–2 inches of vegetable oil in a deep skillet over medium heat until it reaches 350°F (175°C).
- Using tongs, carefully fold one tortilla in half and place it in the hot oil.
- Hold it in a taco shape for about 30 seconds until it starts to firm up.
- Once it keeps its shape, let it fry for about 1–2 minutes per side until golden brown.
- Remove and immediately brush lightly with melted butter.
- Toss or sprinkle generously with the cinnamon sugar mixture.
- Place upright (you can rest them between muffin tin cups) to cool completely.
Repeat with remaining tortillas.
Oven Method (Lighter Option)
- Preheat oven to 375°F (190°C).
- Brush both sides of each tortilla with melted butter.
- Drape tortillas over oven rack bars to form taco shapes.
- Bake for 8–10 minutes until golden and crisp.
- Remove and immediately coat with cinnamon sugar.
Allow shells to cool completely before filling.
🍰 Step 3: Make the Cheesecake Filling
- In a large mixing bowl, beat the softened cream cheese using an electric mixer until completely smooth and creamy (about 2–3 minutes).
- Add powdered sugar, vanilla extract, and lemon juice.
- Beat again until fully incorporated and fluffy.
In a separate chilled bowl:
- Whip the cold heavy cream on medium-high speed until stiff peaks form.
- Gently fold the whipped cream into the cream cheese mixture using a spatula. Do not overmix—fold gently to keep the filling light and airy.
Transfer the cheesecake filling into a piping bag (or zip-top bag with corner snipped). Refrigerate for at least 30 minutes to firm slightly.
🍓 Step 4: Prepare the Berry Mixture
In a bowl, gently combine strawberries, blueberries, and raspberries.
If your berries are slightly tart:
- Sprinkle with 2 tablespoons sugar.
- Add lemon zest.
- Toss gently and let sit for 10–15 minutes to release natural juices.
If berries are already sweet, skip the sugar and just add zest for freshness.
🌮 Step 5: Assemble the Berrylicious Cheesecake Tacos
Make sure taco shells are completely cool.
- Pipe a generous layer of cheesecake filling into each shell.
- Spoon the berry mixture over the filling.
- Add optional toppings like white chocolate drizzle or powdered sugar.
Serve immediately for best texture.
💡 Pro Tips for Perfect Cheesecake Tacos
- Cold cream whips better: Make sure your heavy cream and bowl are very cold.
- Don’t overfill: Too much filling can cause shells to crack.
- Assemble just before serving: Shells stay crisp if filled shortly before serving.
- Stabilize shells: Use a muffin tin to hold them upright while filling.
- Make ahead tip: Prepare filling and shells separately up to 24 hours in advance.
🍫 Fun Variations
Chocolate Berry Cheesecake Tacos
Add 2 tablespoons cocoa powder to the cheesecake mixture.
Lemon Cheesecake Tacos
Increase lemon juice to 2 tablespoons and add extra zest.
No-Fry Air Fryer Version
Air fry buttered tortillas at 350°F (175°C) for 5–6 minutes.
Mixed Berry Sauce Option
Cook berries with 2 tablespoons sugar over medium heat for 5 minutes to create a syrupy topping.
🧊 Storage Instructions
- Store filling in refrigerator up to 3 days.
- Store shells in airtight container at room temperature for 2 days.
- Do NOT store assembled tacos—they will soften.
🎉 Perfect For
- Birthday parties
- Baby showers
- Summer picnics
- Valentine’s Day dessert
- Holiday dessert tables
- Weekend family treats
They’re colorful, festive, and easy to customize with seasonal fruit.
🍽 Nutritional Snapshot (Approximate Per Taco)
- Calories: 280–320
- Fat: 18g
- Carbohydrates: 30g
- Protein: 4g
❤️ Why You’ll Love This Recipe
These Berrylicious Cheesecake Tacos combine textures beautifully:
- Crunchy shell
- Smooth, creamy filling
- Juicy, fresh berries
They look impressive but require simple ingredients and straightforward steps. Plus, they’re portable, portion-controlled, and endlessly adaptable.
Whether you’re hosting guests or just treating yourself, this dessert brings bakery-level charm right into your kitchen.