🌈 Fruity Pebbles Cheesecake Tacos
If you love playful desserts that are colorful, creamy, and guaranteed to impress, these Fruity Pebbles Cheesecake Tacos are about to become your new favorite treat. Inspired by the iconic cereal Fruity Pebbles, this dessert combines crunchy, marshmallow-coated taco shells with a smooth no-bake cheesecake filling. The result? A vibrant, sweet, and slightly nostalgic dessert that’s perfect for birthdays, parties, bake sales, or whenever you’re craving something fun and indulgent.
This recipe makes about 8–10 cheesecake tacos and takes approximately 45 minutes to prepare (plus chilling time). Let’s dive in!
🛒 Ingredients
For the Fruity Pebbles Taco Shells:
- 5 cups Fruity Pebbles cereal
- 4 cups mini marshmallows
- 3 tablespoons unsalted butter
- Cooking spray or parchment paper
For the Cheesecake Filling:
- 16 oz (450 g) cream cheese, softened
- 1 cup powdered sugar
- 1 teaspoon pure vanilla extract
- 1 ½ cups heavy whipping cream (cold)
Optional Toppings:
- Extra Fruity Pebbles cereal
- White chocolate drizzle
- Fresh strawberries (diced)
- Rainbow sprinkles
- Whipped cream
🥣 Step 1: Prepare the Taco Shell Molds
Before you begin cooking, prepare a way to shape your taco shells. You can:
- Turn a muffin tin upside down and use the spaces between the cups.
- Use foil rolled into thick tubes.
- Create makeshift stands with rolled aluminum foil.
Lightly spray the molds with cooking spray so the cereal shells won’t stick.
🌈 Step 2: Make the Fruity Pebbles Taco Shells
In a large saucepan over low heat, melt the butter. Once melted, add the mini marshmallows. Stir constantly until the marshmallows are completely melted and smooth. Keep the heat low to avoid burning.
Remove the pan from heat and immediately stir in the Fruity Pebbles cereal. Mix quickly but gently so all the cereal is coated evenly with the marshmallow mixture.
Allow the mixture to cool slightly (about 1–2 minutes). It should still be warm and pliable but not too hot to handle.
Scoop about ½ cup of the cereal mixture into your hands (lightly greased with butter or cooking spray) and gently shape it into a taco shell form. Drape it over your prepared mold and press gently to shape.
Repeat with the remaining mixture.
Let the shells cool completely and firm up for about 20–30 minutes. Once set, carefully remove them from the molds.
💡 Tip: Work quickly! The cereal mixture becomes harder to shape as it cools.
🍰 Step 3: Prepare the Cheesecake Filling
In a large mixing bowl, beat the softened cream cheese using an electric mixer until smooth and fluffy (about 2–3 minutes). Scrape down the sides of the bowl to avoid lumps.
Add the powdered sugar and vanilla extract. Beat again until fully combined and silky.
In a separate bowl, whip the cold heavy cream until stiff peaks form. This usually takes about 3–4 minutes on medium-high speed.
Gently fold the whipped cream into the cream cheese mixture using a spatula. Do not overmix — you want to keep the filling light and airy.
The result should be a smooth, fluffy no-bake cheesecake filling.
🌟 Step 4: Fill the Taco Shells
Transfer the cheesecake mixture into a piping bag (or a zip-top bag with the corner cut off).
Pipe the filling generously into each Fruity Pebbles taco shell. Fill from one end to the other, making sure the filling is evenly distributed.
For best results, refrigerate the filled tacos for at least 1 hour before serving. This helps the filling firm up and enhances the flavor.
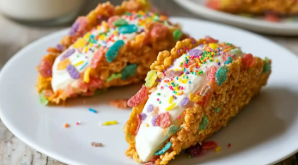
🎉 Step 5: Add Toppings
Now for the fun part — decorating!
Sprinkle extra Fruity Pebbles over the top for added crunch and color.
Drizzle melted white chocolate for a sweet finishing touch.
Add diced strawberries for freshness.
Top with whipped cream for extra indulgence.
Scatter rainbow sprinkles for even more fun.
These tacos are a visual showstopper — bright, playful, and absolutely irresistible.
🧁 Flavor Variations
Want to customize your cheesecake tacos? Try these creative twists:
1️⃣ Chocolate Cheesecake Version
Add ¼ cup cocoa powder to the cheesecake filling for a chocolate twist. Drizzle with melted chocolate instead of white chocolate.
2️⃣ Strawberry Cheesecake
Mix ½ cup strawberry puree into the filling and top with fresh strawberries.
3️⃣ Lemon Cheesecake
Add 1 tablespoon fresh lemon juice and 1 teaspoon lemon zest for a bright citrus flavor.
4️⃣ Birthday Cake Style
Mix in rainbow sprinkles to the cheesecake filling and top with extra cereal and frosting drizzle.
🧊 Storage Tips
- Store in an airtight container in the refrigerator for up to 3 days.
- The shells may soften slightly over time due to moisture from the filling.
- For best texture, fill them the day you plan to serve.
- You can prepare the shells 1–2 days in advance and store them separately at room temperature.
💡 Pro Tips for Perfect Cheesecake Tacos
✔ Use full-fat cream cheese for the richest flavor and best texture.
✔ Make sure cream cheese is fully softened to prevent lumps.
✔ Chill your mixing bowl before whipping cream for better volume.
✔ Work quickly when shaping cereal shells.
✔ Don’t overfill the tacos — they can become too heavy and crack.
🎂 Perfect Occasions to Serve These
- Birthday parties
- Baby showers
- Kids’ sleepovers
- Carnival-themed events
- Holiday dessert tables
- Potlucks
They’re especially popular because they combine nostalgia (who didn’t grow up loving colorful cereal?) with a trendy dessert presentation.
🍓 Why You’ll Love This Recipe
These Fruity Pebbles Cheesecake Tacos are:
✨ No-bake
✨ Colorful and eye-catching
✨ Easy to customize
✨ Perfect for beginners
✨ Fun for kids and adults alike
The crunchy marshmallow shell contrasts beautifully with the creamy cheesecake filling. Each bite delivers sweetness, texture, and a little burst of fruity crunch.
📝 Make-Ahead & Freezing Notes
You can freeze the empty cereal shells for up to 1 month in an airtight container with parchment paper between layers. Thaw at room temperature before filling.
Freezing fully assembled tacos is not recommended, as the filling texture may change.
🥄 Final Thoughts
Desserts should be joyful — and these Fruity Pebbles Cheesecake Tacos absolutely deliver on that promise. They bring together the playful crunch of Fruity Pebbles cereal and the rich smoothness of cheesecake in a handheld format that’s both nostalgic and modern.
Whether you’re making them for a celebration or just because you’re craving something colorful and sweet, this recipe guarantees smiles. They’re fun to prepare, even more fun to decorate, and completely unforgettable to eat.