There is something truly irresistible about a warm, flaky Homemade Cheese Danish fresh from the oven. With its buttery layers of pastry and a creamy, lightly sweetened cheese filling, this classic pastry is a staple in bakeries and cafés around the world. Originating from the traditions of Danish baking, this treat combines delicate laminated dough with a rich filling made from cream cheese, sugar, and vanilla. While many people believe making Danish pastry at home is difficult, this detailed recipe will guide you step by step so you can create bakery-quality results in your own kitchen.
This homemade version is far superior to store-bought pastries. The dough is tender and flaky, the filling is creamy and flavorful, and the finished pastries can be customized with fruit, icing, or nuts. Whether you serve them for breakfast, brunch, or dessert, these pastries are guaranteed to impress.
Ingredients
For the Danish Dough
- 3 ½ cups all-purpose flour
- ¼ cup granulated sugar
- 1 teaspoon salt
- 2 ¼ teaspoons active dry yeast (1 packet)
- ¾ cup warm milk (about 110°F / 43°C)
- 1 large egg
- 1 teaspoon vanilla extract
- 1 cup unsalted butter (cold, for laminating)
For the Cream Cheese Filling
- 8 oz cream cheese, softened
- ¼ cup granulated sugar
- 1 egg yolk
- 1 teaspoon vanilla extract
- 1 teaspoon lemon zest (optional but recommended)
For the Egg Wash
- 1 egg
- 1 tablespoon milk
Optional Glaze
- 1 cup powdered sugar
- 2–3 tablespoons milk
- ½ teaspoon vanilla extract
Step 1: Prepare the Dough
Start by activating the yeast. In a small bowl, combine the warm milk and yeast. Let it sit for about 5–10 minutes until it becomes foamy. This indicates the yeast is active and ready to use.
In a large mixing bowl, combine the flour, sugar, and salt. Add the yeast mixture, egg, and vanilla extract. Mix everything together until a soft dough begins to form.
Transfer the dough onto a lightly floured surface and knead for about 6–8 minutes until smooth and elastic. If the dough feels sticky, add a small amount of flour.
Once kneaded, shape the dough into a ball and place it in a lightly greased bowl. Cover with plastic wrap or a clean kitchen towel and allow it to rise for 1 hour, or until doubled in size.
Step 2: Prepare the Butter Layer
Laminated dough is what gives Danish pastry its famous flaky layers. To create this texture, butter must be folded into the dough in layers.
Place the cold butter between two sheets of parchment paper and use a rolling pin to flatten it into a square about 6 x 6 inches. Refrigerate until firm but still pliable.
Step 3: Laminate the Dough
After the dough has risen, roll it out on a floured surface into a 12 x 12 inch square.
Place the butter square diagonally in the center of the dough. Fold each corner of the dough over the butter so it completely encloses it, like an envelope.
Next, roll the dough into a rectangle about 10 x 18 inches.
Fold the dough into thirds, like folding a letter. This is called the first fold.
Wrap the dough in plastic wrap and refrigerate for 30 minutes.
Repeat the rolling and folding process two more times, chilling the dough for 30 minutes between each fold. This creates the delicate buttery layers that make Danish pastries so light and flaky.
Step 4: Make the Cream Cheese Filling
While the dough chills, prepare the filling.
In a medium bowl, combine:
- Softened cream cheese
- Sugar
- Egg yolk
- Vanilla extract
- Lemon zest
Use a hand mixer or whisk to beat the mixture until smooth and creamy. The filling should be thick but spreadable.
Refrigerate the filling until ready to assemble the pastries.
Step 5: Shape the Danish Pastries
Once the dough has completed its final chill, roll it out on a floured surface into a ¼-inch thick rectangle.
Cut the dough into 4 x 4 inch squares.
There are several ways to shape Danish pastries. One popular method is the classic envelope shape:
- Place a spoonful of cream cheese filling in the center of each square.
- Fold two opposite corners toward the center.
- Press lightly so they stick.
Another option is the pinwheel style, where each corner is partially cut and folded toward the center.
Place the shaped pastries on a baking sheet lined with parchment paper, leaving space between each one.
Step 6: Second Rise
Cover the pastries lightly with a towel and let them rise for 30–40 minutes. They should look slightly puffed but not doubled in size.
Meanwhile, preheat your oven to 375°F (190°C).
Step 7: Egg Wash and Bake
In a small bowl, whisk together the egg and milk to create an egg wash.
Brush the edges of each pastry lightly with the egg wash. This helps create a beautiful golden color when baked.
Bake the pastries for 15–18 minutes, or until they are golden brown and flaky.
The aroma of buttery pastry filling your kitchen is one of the best rewards of homemade baking.
Step 8: Prepare the Glaze
While the pastries cool slightly, prepare a simple glaze.
In a small bowl, whisk together:
- Powdered sugar
- Milk
- Vanilla extract
The glaze should be smooth and pourable. If it is too thick, add a little more milk.
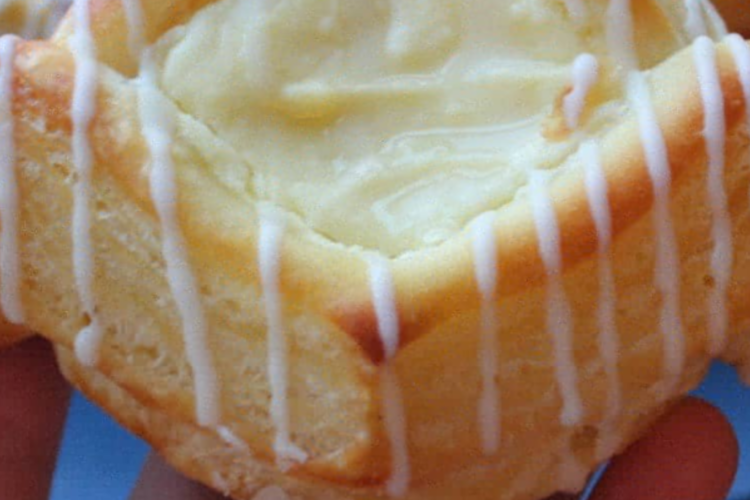
Drizzle the glaze over the warm Danish pastries for a bakery-style finish.
Step 9: Serve and Enjoy
Homemade Cheese Danish pastries are best enjoyed slightly warm, when the pastry is crisp and the filling is soft and creamy.
They pair wonderfully with:
- Fresh coffee
- Tea
- Hot chocolate
- Fresh fruit
These pastries are perfect for breakfast, brunch, or special occasions. If you’re hosting guests, arrange them on a platter with fresh berries and a dusting of powdered sugar for a beautiful presentation.
Tips for Perfect Danish Pastries
1. Keep the butter cold
Cold butter creates steam while baking, which forms the flaky layers.
2. Chill the dough between folds
This prevents the butter from melting and keeps the layers defined.
3. Do not overfill
Too much filling can cause the pastries to leak while baking.
4. Use parchment paper
This prevents sticking and makes cleanup easy.
Flavor Variations
Once you master the basic cheese Danish recipe, you can experiment with many variations:
Berry Danish – Add a spoonful of raspberry or blueberry jam on top of the cheese filling.
Apple Danish – Add cinnamon sautéed apples.
Almond Danish – Sprinkle sliced almonds and add almond extract to the filling.
Chocolate Danish – Add small chocolate chips or Nutella.
Storage Tips
If you have leftovers, store them in an airtight container in the refrigerator for up to 3 days.
To reheat, place the pastries in a 300°F (150°C) oven for 5–7 minutes. This helps restore the flaky texture.
You can also freeze unbaked Danish pastries and bake them fresh later.
Final Thoughts
Making Homemade Cheese Danish from scratch may take some time, but the results are absolutely worth it. The buttery laminated dough, creamy filling, and delicate glaze create a pastry that rivals anything from a professional bakery.
Once you taste the fresh, flaky layers and rich cream cheese center, you’ll understand why this classic pastry has remained a favorite for generations.
Bake a batch for family or friends, and enjoy the satisfaction of creating a truly authentic homemade Danish pastry right in your own kitchen.