Indulgent Burnt Basque Cheesecake in a Loaf Pan You’ll Love
Why This Cheesecake Is Pure Magic
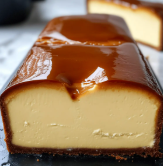
Burnt Basque cheesecake (originally from San Sebastián, Spain) breaks all the classic cheesecake rules—and that’s exactly why people obsess over it. Instead of pale and pristine, it’s boldly baked at high heat until the top is almost scorched. Instead of firm and dense, the center stays luxuriously creamy, almost like a custard.
Baking it in a loaf pan makes it even better:
- Perfect size for small gatherings (or strategic solo indulgence)
- Taller slices with dramatic layers
- Faster baking and easier slicing
- No springform pan needed
This is the kind of dessert that feels restaurant-level but is secretly low effort. Dangerous, honestly.
Ingredients (Simple but Powerful)
For the cheesecake:
- 450 g (16 oz) full-fat cream cheese, very soft
- 180 g (¾ cup + 2 tbsp) granulated sugar
- 3 large eggs, room temperature
- 240 ml (1 cup) heavy cream (35% fat preferred)
- 1 tbsp vanilla extract
- 20 g (2 tbsp) all-purpose flour, sifted
- ¼ tsp fine salt
That’s it. No lemon zest, no crust, no distractions. This cheesecake shines because of balance and technique.
Equipment You’ll Need
- 1 standard loaf pan (approx. 9 x 5 inches / 23 x 13 cm)
- Parchment paper
- Hand mixer, stand mixer, or sturdy whisk
- Rubber spatula
- Fine sieve (optional but recommended)
Step 1: Prep the Pan (Don’t Skip This)
Preheat your oven to 220°C / 425°F. High heat is essential for that iconic burnt top.
Line your loaf pan with parchment paper, pressing it into the corners and letting the paper rise well above the edges. Don’t worry about wrinkles—those folds are part of the Basque cheesecake’s rustic charm.
Lightly grease the parchment if you’re paranoid (optional, but relatable).
Step 2: Cream Cheese + Sugar = Foundation of Flavor
In a large bowl, beat the soft cream cheese until completely smooth. Take your time here—lumps are the enemy.
Add the sugar and beat again until the mixture looks creamy, glossy, and slightly lighter in color. Scrape down the bowl often.
💡 Pro tip: Avoid whipping in too much air. You want smooth and dense, not fluffy.
Step 3: Add the Eggs (One at a Time)
Add the eggs one by one, mixing just until each is incorporated before adding the next. This helps create that silky custard texture.
At this stage, the batter should look smooth and pourable, like thick cream.
Step 4: Cream, Vanilla, and That Final Silkiness
Slowly pour in the heavy cream while mixing on low speed. Add the vanilla extract and salt.
The batter will loosen and become beautifully glossy. You’re on the right track.
Step 5: Flour—Just Enough
Sift in the flour and gently mix until fully incorporated. The flour gives the cheesecake just enough structure so it slices cleanly while staying molten in the center.
Optional but recommended: pass the batter through a fine sieve for ultra-smooth results. This step is chef-level extra—but worth it.
Step 6: Bake It Hot and Bold
Pour the batter into your prepared loaf pan. Tap it gently on the counter to release air bubbles.
Place the pan on the middle rack and bake at 220°C / 425°F for 40–45 minutes.
What You’re Looking For:
- Top: deeply golden to almost burnt (don’t panic!)
- Edges: set and slightly puffed
- Center: visibly jiggly when gently shaken
If your oven runs hot, start checking at 38 minutes. Every oven has its own personality.
Step 7: Cool (Patience Is Part of the Recipe)
Remove the cheesecake from the oven and let it cool in the pan for at least 1 hour. It will deflate slightly—this is normal and beautiful.
For the best texture:
- Chill for at least 4 hours, preferably overnight
- Or enjoy slightly warm for a lava-like center (dangerously good)
Texture & Flavor Notes (What to Expect)
This cheesecake is:
- Burnt and bittersweet on top
- Ultra-creamy and custardy inside
- Rich but not heavy
- Balanced, not overly sweet
Every bite contrasts caramelized depth with vanilla creaminess. It’s sophisticated without being pretentious.
Serving Ideas (Minimal but Elegant)
Serve it plain—it truly doesn’t need anything.
If you must accessorize:
- Fresh berries for brightness
- A drizzle of honey or salted caramel
- Espresso or strong coffee on the side ☕
- Lightly whipped cream (keep it subtle)
Slice with a hot knife for clean, dramatic cuts.
Storage Tips
- Refrigerate up to 4 days, tightly wrapped
- Flavor actually improves on day 2
- Not freezer-friendly (but let’s be real—it won’t last that long)
Common Mistakes to Avoid
- ❌ Cold cream cheese → lumpy batter
- ❌ Overmixing → cracked, airy cheesecake
- ❌ Low oven temperature → pale, boring top
- ❌ Overbaking → dry center (tragic)
Final Thoughts
This Burnt Basque Cheesecake in a Loaf Pan is proof that indulgence doesn’t have to be complicated. It’s bold, comforting, dramatic, and effortlessly chic—just like the best desserts should be.