🌺 Hibiscus Lemon Bars (A 1000-Word Recipe Guide)
✨ Introduction
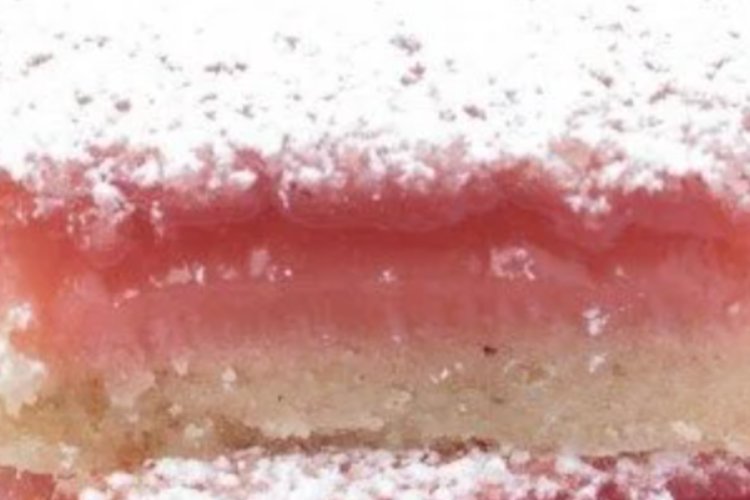
Hibiscus Lemon Bars are a vibrant, elegant dessert that elevates the traditional lemon bar into something truly special. The bold ruby-red hue of hibiscus paired with the bright yellow of lemon creates a visually stunning treat, while the flavor is a perfect balance of tart, sweet, and slightly floral.
Hibiscus (often brewed as tea) has a naturally tangy, cranberry-like flavor that complements lemon beautifully. When incorporated into lemon bars, it deepens the flavor and adds a sophisticated twist that’s perfect for gatherings, afternoon tea, or simply indulging yourself.
🛒 Ingredients
For the Shortbread Crust:
- 1 cup (225g) unsalted butter, softened
- ½ cup (100g) granulated sugar
- 2 cups (250g) all-purpose flour
- ¼ teaspoon salt
- 1 teaspoon vanilla extract
For the Hibiscus Lemon Filling:
- 1 cup (240ml) strong hibiscus tea (cooled)
- 1 cup (200g) granulated sugar
- 4 large eggs
- ½ cup (120ml) fresh lemon juice (about 3–4 lemons)
- 1 tablespoon lemon zest
- ⅓ cup (40g) all-purpose flour
- 1 tablespoon cornstarch
- ¼ teaspoon salt
For Garnish:
- Powdered sugar (for dusting)
- Dried hibiscus petals (optional)
- Lemon slices or zest curls
🍵 Step 1: Prepare the Hibiscus Tea
Start by brewing a strong hibiscus tea:
- Bring 1½ cups of water to a boil.
- Add 3–4 tablespoons of dried hibiscus flowers.
- Let steep for 10–15 minutes until deeply colored and tart.
- Strain and measure out 1 cup.
- Allow it to cool completely.
Tip: The stronger the tea, the more intense the flavor and color of your bars.
🍪 Step 2: Make the Shortbread Crust
The crust is buttery, tender, and slightly crumbly—perfect for holding the vibrant filling.
- Preheat your oven to 350°F (175°C).
- Line a 9×13-inch baking pan with parchment paper.
- In a large bowl, cream together the butter and sugar until light and fluffy.
- Add vanilla extract and mix well.
- In a separate bowl, whisk together flour and salt.
- Gradually add dry ingredients to the butter mixture, mixing until a soft dough forms.
- Press the dough evenly into the prepared pan.
Bake for 18–20 minutes, or until the edges are lightly golden.
Remove from the oven and let it cool slightly while you prepare the filling.
🍋 Step 3: Prepare the Hibiscus Lemon Filling
This is where the magic happens—the fusion of floral hibiscus and zesty lemon.
- In a mixing bowl, whisk together eggs and sugar until smooth and slightly pale.
- Add the cooled hibiscus tea and fresh lemon juice.
- Stir in lemon zest for an extra burst of citrus aroma.
- Sift in flour, cornstarch, and salt.
- Whisk until fully combined and smooth.
The mixture should be thin but well blended.
🔥 Step 4: Bake the Bars
- Pour the filling over the warm (not hot) crust.
- Return the pan to the oven.
- Bake for 25–30 minutes, or until the center is set and no longer jiggles excessively.
The top should look slightly glossy but firm.
❄️ Step 5: Cooling and Setting
This step is crucial for clean slices and the perfect texture.
- Allow the bars to cool at room temperature for about 1 hour.
- Transfer to the refrigerator and chill for at least 2 hours (or overnight).
Chilling helps the filling fully set and enhances the flavor.
✂️ Step 6: Cutting and Serving
- Lift the bars out using the parchment paper.
- Place on a cutting board.
- Use a sharp knife (wipe clean between cuts) to slice into squares or rectangles.
Dust generously with powdered sugar just before serving.
🌸 Flavor Profile
These bars are a sensory experience:
- Tangy: From fresh lemon juice
- Fruity-tart: From hibiscus
- Sweet: Balanced to avoid overwhelming tartness
- Buttery: Thanks to the rich shortbread base
The hibiscus adds complexity, making these bars taste more refined than traditional lemon bars.
💡 Tips for Success
- Use fresh lemons: Bottled juice won’t give the same brightness.
- Strain the filling: For an ultra-smooth texture, strain before baking.
- Don’t overbake: The center should still have a slight wobble.
- Chill thoroughly: This prevents messy slices.
- Adjust sweetness: Add more sugar if you prefer less tartness.
🔄 Variations
1. Coconut Hibiscus Lemon Bars
Add ½ cup shredded coconut to the crust for a tropical twist.
2. Berry Hibiscus Bars
Mix in a handful of crushed raspberries for added fruitiness.
3. Gluten-Free Version
Use a gluten-free flour blend for both crust and filling.
4. Vegan Option
Replace eggs with a mixture of cornstarch slurry and plant-based yogurt, though texture will vary.
🍽️ Serving Ideas
- Serve chilled with tea or coffee
- Pair with whipped cream or vanilla ice cream
- Garnish with edible flowers for a stunning presentation
- Add a drizzle of honey or glaze for extra sweetness
🧊 Storage
- Refrigerator: Store in an airtight container for up to 5 days
- Freezer: Freeze for up to 2 months (wrap tightly)
- Thaw overnight in the fridge before serving
🌟 Final Thoughts
Hibiscus Lemon Bars are more than just a dessert—they’re a statement. The bold color, unique flavor combination, and elegant presentation make them perfect for special occasions or whenever you want to impress.
They strike a beautiful balance between familiar comfort and exotic flair. Once you try them, you may never go back to plain lemon bars again.