Mini Cloud Cakes – Light, Fluffy & Party-Perfect Bites
Mini Cloud Cakes are the kind of dessert that instantly elevates any gathering. Light as air, delicately sweet, and irresistibly soft, these tiny cakes live up to their dreamy name. Perfect for parties, afternoon tea, birthdays, or even just a cozy indulgence at home, they offer elegance in every bite-sized portion. Their fluffy texture comes from carefully whipped eggs and gentle folding techniques, while their subtle sweetness makes them versatile enough to pair with fruits, creams, or glazes.
In this detailed recipe, you’ll learn how to create perfectly airy Mini Cloud Cakes from scratch, along with tips to ensure consistent success every time.
Ingredients
For the Cloud Cakes:
- 4 large eggs, separated
- 100 g (½ cup) granulated sugar, divided
- 60 ml (¼ cup) whole milk
- 60 ml (¼ cup) vegetable oil
- 1 teaspoon vanilla extract
- 90 g (¾ cup) cake flour (sifted)
- 1 teaspoon baking powder
- ¼ teaspoon salt
- ½ teaspoon cream of tartar (or a few drops of lemon juice)
Optional Toppings & Fillings:
- Whipped cream
- Fresh berries (strawberries, raspberries, blueberries)
- Powdered sugar
- Lemon glaze or chocolate drizzle
- Fruit compote
Equipment
- Mixing bowls (at least 2)
- Electric mixer or hand whisk
- Silicone spatula
- Mini cake molds or muffin tin
- Parchment paper liners
- Sifter
- Cooling rack
Step-by-Step Instructions
Step 1: Prepare Your Workspace
Begin by preheating your oven to 160°C (320°F). Line your mini cake molds or muffin tin with parchment liners. Ensuring your equipment is clean and dry is crucial, especially for whipping egg whites—any grease can prevent them from reaching stiff peaks.
Step 2: Separate the Eggs
Carefully separate the egg whites from the yolks. Place the whites in a large, clean bowl and the yolks in another. Make sure no yolk gets into the whites, as this can affect the whipping process.
Step 3: Mix the Yolks
To the egg yolks, add 50 g (¼ cup) of the sugar. Whisk until the mixture becomes pale and slightly thickened. Add the milk, vegetable oil, and vanilla extract, then mix until smooth and fully combined.
Step 4: Incorporate Dry Ingredients
Sift the cake flour, baking powder, and salt into the yolk mixture. Gently whisk until you get a smooth batter without lumps. Avoid overmixing, as this can make the cakes dense.
Step 5: Whip the Egg Whites
Add the cream of tartar (or lemon juice) to the egg whites. Using an electric mixer, beat on medium speed until soft peaks form. Gradually add the remaining 50 g (¼ cup) sugar while continuing to beat. Increase the speed to high and whip until stiff, glossy peaks form.
This step is key to achieving the “cloud-like” texture—your meringue should hold its shape but still look smooth and shiny.
Step 6: Fold the Batter
Take about one-third of the whipped egg whites and gently fold them into the yolk batter using a spatula. This lightens the mixture. Then, carefully fold in the remaining egg whites in two additions.
Use a gentle motion: cut through the center, scrape the bottom, and fold over. Rotate the bowl as you go. Avoid stirring, as this will deflate the air bubbles.
Step 7: Fill the Molds
Spoon or pipe the batter into your prepared molds, filling each about ¾ full. Tap the tray lightly on the counter to release any large air bubbles.
Step 8: Bake to Perfection
Bake in the preheated oven for 18–22 minutes, or until the tops are lightly golden and spring back when touched. Avoid opening the oven door too early, as sudden temperature changes can cause the cakes to collapse.
Step 9: Cool Gently
Once baked, remove the cakes from the oven and let them cool in the pan for a few minutes before transferring them to a cooling rack. Allow them to cool completely before adding toppings.
Decorating Your Mini Cloud Cakes
These cakes are incredibly versatile and can be dressed up in many ways:
Classic Style:
Dust with powdered sugar for a simple, elegant finish.
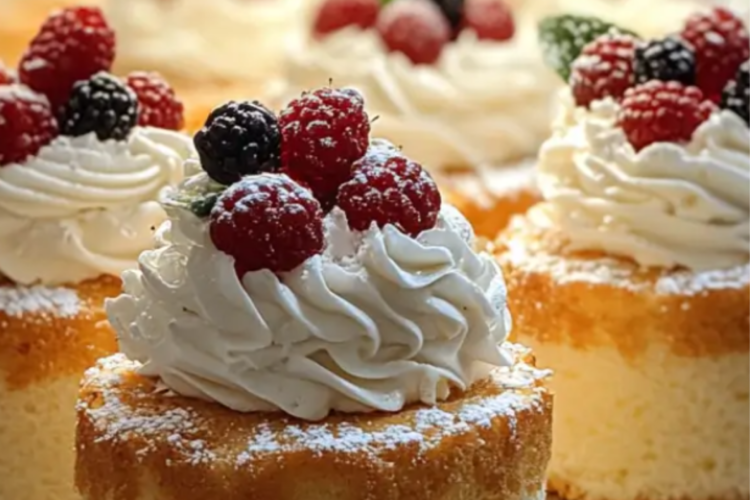
Berry Delight:
Top with whipped cream and fresh berries for a refreshing contrast.
Chocolate Lovers:
Drizzle melted chocolate over the top or dip the tops for a richer dessert.
Citrus Glaze:
Mix powdered sugar with lemon juice to create a tangy glaze that enhances the lightness of the cake.
Layered Mini Cakes:
Slice each mini cake in half and fill with cream or jam for a sandwich-style treat.
Tips for Success
- Use Room Temperature Eggs
They whip more easily and create a more stable meringue. - Be Gentle When Folding
This preserves the air bubbles that make the cakes fluffy. - Don’t Overbake
Overbaking can dry out the cakes and reduce their soft texture. - Use Cake Flour
It has a lower protein content, resulting in a softer crumb. - Avoid Moisture in Egg Whites
Even a small amount of water or yolk can prevent proper whipping.
Storage
Mini Cloud Cakes are best enjoyed fresh but can be stored:
- At room temperature: in an airtight container for up to 2 days
- In the refrigerator: up to 4 days (especially if topped with cream)
- Freezer: wrap individually and freeze for up to 1 month; thaw at room temperature before serving
Flavor Variations
Once you’ve mastered the basic recipe, you can experiment with flavors:
- Matcha Cloud Cakes: Add 1 teaspoon matcha powder to the dry ingredients
- Chocolate Version: Replace 15 g of flour with cocoa powder
- Almond Twist: Add almond extract and top with sliced almonds
- Coconut Cloud Cakes: Substitute part of the milk with coconut milk
Serving Ideas
Mini Cloud Cakes are perfect for:
- Birthday parties
- Baby showers
- Afternoon tea
- Dessert buffets
- Holiday gatherings
Arrange them on a tiered stand for a stunning presentation, or package them in small boxes as edible gifts.
Final Thoughts
Mini Cloud Cakes are more than just a dessert—they’re a delicate experience. Their soft, airy texture and subtle sweetness make them universally appealing, while their miniature size adds charm and elegance. Though they may seem delicate, with the right technique and a bit of patience, they are surprisingly approachable to make at home.
Whether you keep them simple or dress them up with creative toppings, these cakes are guaranteed to impress. Once you take a bite, you’ll understand exactly why they’re called “cloud cakes”—they practically melt in your mouth.