No-Bake Mini Orange Cheesecakes
No-bake mini orange cheesecakes are a delightful treat that combines the tangy brightness of fresh oranges with the smooth richness of cream cheese. These individual desserts are perfect for warm days when you don’t want to turn on the oven, yet still crave something indulgent and refreshing. With a buttery biscuit base, a silky orange-infused filling, and a vibrant topping, these cheesecakes are as beautiful as they are delicious.
🛒 Ingredients
For the Crust:
- 1 ½ cups (150 g) crushed digestive biscuits or graham crackers
- 6 tablespoons (85 g) melted butter
- 2 tablespoons sugar (optional)
For the Orange Cheesecake Filling:
- 400 g (14 oz) cream cheese (softened)
- 1 cup (240 ml) heavy cream (cold)
- ¾ cup (150 g) granulated sugar
- Zest of 2 oranges
- ½ cup (120 ml) fresh orange juice
- 1 teaspoon vanilla extract
- 1 tablespoon gelatin powder (or agar-agar for vegetarian option)
- 3 tablespoons warm water (to dissolve gelatin)
For the Topping:
- Orange slices or segments
- Orange zest
- Optional: orange glaze or marmalade
🍽️ Equipment
- Mixing bowls
- Hand mixer or stand mixer
- Silicone muffin molds or cupcake liners
- Spoon or small glass (for pressing crust)
- Refrigerator
👩🍳 Instructions
Step 1: Prepare the Crust
In a mixing bowl, combine:
- Crushed biscuits
- Melted butter
- Sugar (if using)
Mix until the texture resembles wet sand. The butter helps bind the crumbs together, forming a firm base once chilled.
Spoon the mixture evenly into your muffin molds or liners. Press it down firmly using the back of a spoon or a small glass to create a compact layer.
Place the crusts in the refrigerator for 20–30 minutes to set.
Step 2: Prepare the Gelatin
In a small bowl, sprinkle the gelatin over warm water and let it bloom for about 5 minutes. Then gently heat it (microwave or stovetop) until fully dissolved. Do not boil.
This step ensures your cheesecakes will hold their shape without baking.
Step 3: Make the Cheesecake Filling
In a large bowl, beat the softened cream cheese until smooth and creamy. This step is crucial to avoid lumps.
Add:
- Sugar
- Orange zest
- Orange juice
- Vanilla extract
Mix until fully combined and silky.
Step 4: Whip the Cream
In a separate bowl, whip the cold heavy cream until soft peaks form. The whipped cream adds lightness and gives the cheesecake a mousse-like texture.
Step 5: Combine Everything
Gently fold the whipped cream into the cream cheese mixture. Use a spatula and fold slowly to keep the mixture airy.
Next, slowly pour in the dissolved gelatin while mixing gently. Make sure it’s evenly incorporated.
The final mixture should be smooth, fluffy, and lightly citrus-scented.
Step 6: Assemble the Mini Cheesecakes
Remove the chilled crusts from the refrigerator.
Spoon or pipe the cheesecake filling over each crust, filling each mold to the top. Smooth the surface with a spatula.
Tap the molds lightly on the counter to remove air bubbles.
Step 7: Chill Until Set
Place the mini cheesecakes in the refrigerator for at least 4 hours, or preferably overnight.
During this time, the gelatin will set, and the flavors will develop beautifully.
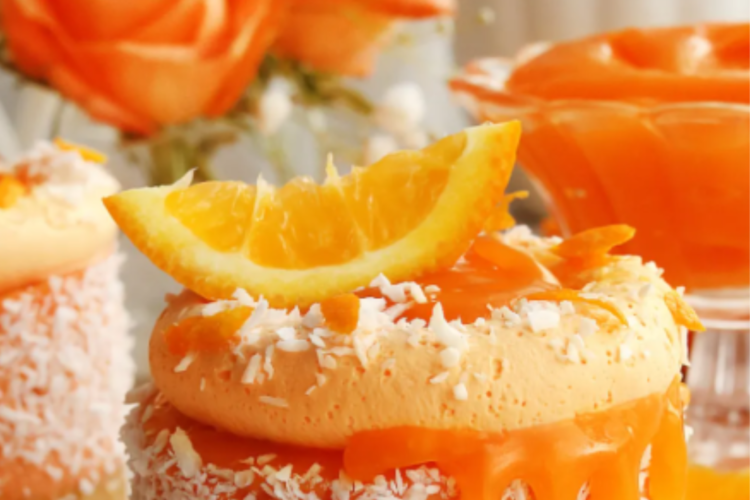
Step 8: Add the Toppings
Once fully set, carefully remove the cheesecakes from the molds.
Decorate with:
- Fresh orange segments
- A sprinkle of orange zest
- A light brush of marmalade or glaze for shine
This step adds both visual appeal and an extra burst of citrus flavor.
🍽️ Serving Suggestions
Serve these mini cheesecakes chilled for the best texture and flavor. They are perfect for:
- Summer gatherings ☀️
- Afternoon tea 🍵
- Dinner parties 🍽️
- Light desserts after a heavy meal
Pair them with a refreshing drink like iced tea or citrus-infused water.
💡 Tips for Perfect Results
- Use fresh oranges: Fresh juice and zest give the best flavor.
- Soften cream cheese fully: This prevents lumps.
- Whip cream properly: Soft peaks are ideal for a light texture.
- Don’t rush chilling: Proper setting is key to clean, firm cheesecakes.
- Taste before setting: Adjust sweetness or citrus to your liking.
🌟 Variations
1. Chocolate Orange Version
Add melted dark chocolate to the filling or drizzle it on top for a classic flavor combination.
2. Tropical Twist
Mix in a bit of coconut cream or pineapple juice for a tropical vibe.
3. Low-Sugar Option
Use a sugar substitute and reduce the amount of sweetener.
4. Vegan Version
Use plant-based cream cheese, coconut cream, and agar-agar instead of gelatin.
🧡 Why This Recipe Works
These cheesecakes are loved because they are:
- No-bake and easy
- Light yet creamy
- Bright and refreshing
- Perfectly portioned
The combination of buttery crust and citrusy filling creates a balanced dessert that’s not too heavy.
🏡 Storage
- Store in the refrigerator for up to 4–5 days
- Keep covered to prevent drying out
- Do not leave at room temperature for long periods
You can also freeze them (without toppings) for up to 1 month and thaw in the fridge before serving.
🍊 Final Thoughts
No-Bake Mini Orange Cheesecakes are the ultimate crowd-pleasing dessert—simple to make, visually stunning, and bursting with fresh citrus flavor. Their creamy texture and refreshing taste make them a go-to recipe for warm weather or anytime you want a light, elegant treat.
Whether you’re making them for guests or just treating yourself, these mini cheesecakes deliver a perfect balance of sweetness and tanginess in every bite.